Monday, 23 November 2015

Nineteen fourty


Logo_main


1940s Fashion: The Decade Captured

Francesca Rice
Read more at http://www.marieclaire.co.uk/blogs/544203/1940s-fashion-the-decade-captured-in-40-incredible-pictures.html#5Q2MiZQcXAmlJ6ye.99

Despite the hardships of WWII, fashion in the 1940s still ruled as women everywhere embraced a more utilitarian (yet chic) look, and Hollywood's Golden Age stars - from Rita Hayworth to Katharine Hepburn - dazzled in gorgeous gowns. We highlight the key looks of the decade in 40 stunning images and list our favourite vintage fashion shops so you can get the style yourself...

1. Joan Crawford, 1940s
Check out Joan Crawford's shoulder pads and decadent jewels – now we know where Joan Collins got her Dynasty inspo from. A perfectly-tailored peplum finishes off her sharp look. Power dressing at its very best.

2. Christian Dior's New Look, 1947
Dior's groundbreaking new silhouette redefined women's post-war style and revived France's fashion industry after a difficult few years. The collection – featuring gorgeous full skirts and waist-cinching jackets – was Christian's first and became forever known as the New Look after Harper's editor Carmel Snow said in 1947: 'It's such a new look!' Imagine if every designer could knock together something like this for their debut...

3. Ava Gardner, 1944
Ava Gardner was one of the decade's most successful (and beautiful) actresses. Here she is in 1944, showcasing the beauty of a belted waist and a chic neckerchief.

4. Bette Davis, 1943
An original pin-up girl, Bette Davis works a blue gown in this seductive shot, taken in 1943.

5. Doris Day, 1948
Doris Day shows us how to work the nautical trend during the filming of Romance On The High Seas in 1948. Remind us to drape our blazer over our shoulders on our next boat trip...

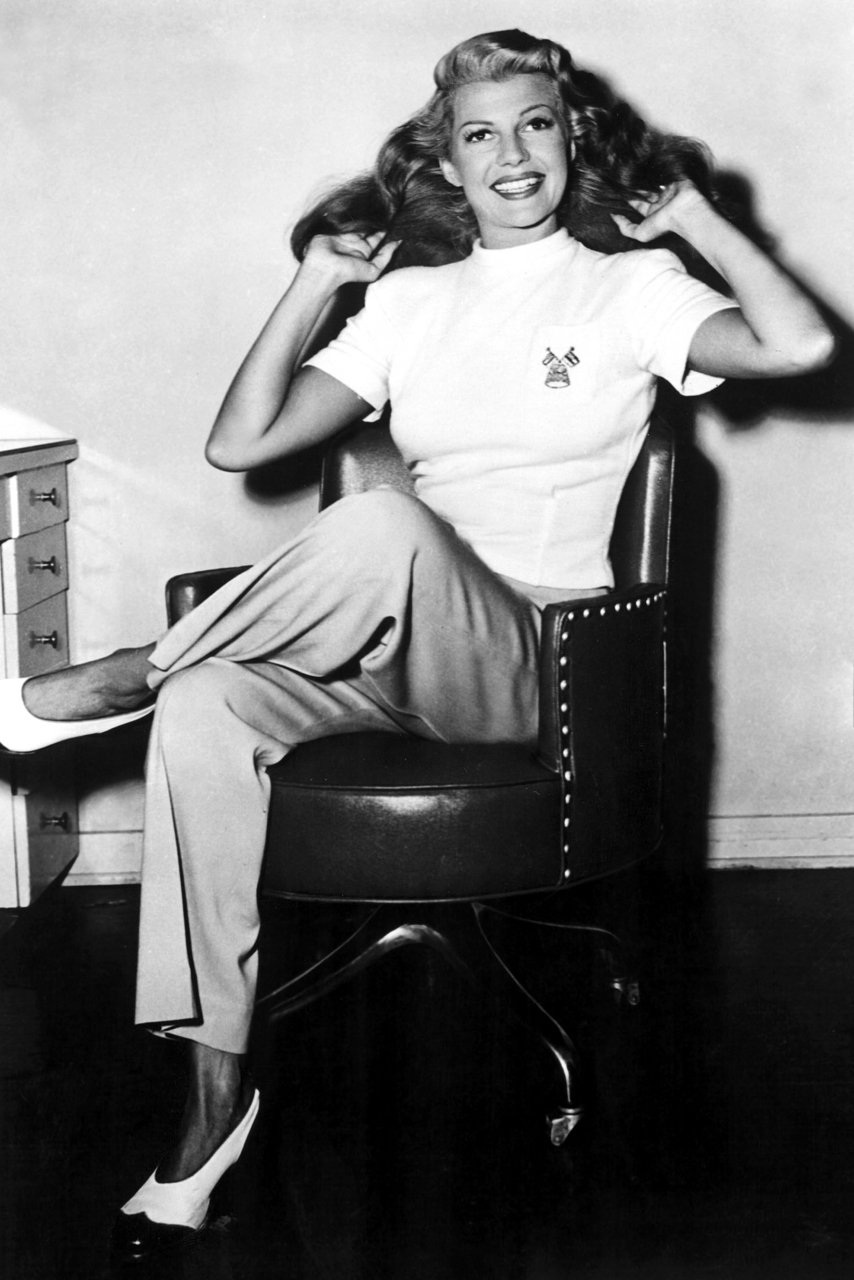
6. Rita Hayworth, 1940
The actress embraces androgynous style in a pair of wide-legged trousers and monochrome flats in 1940. Our new workwear wardrobe = sorted.

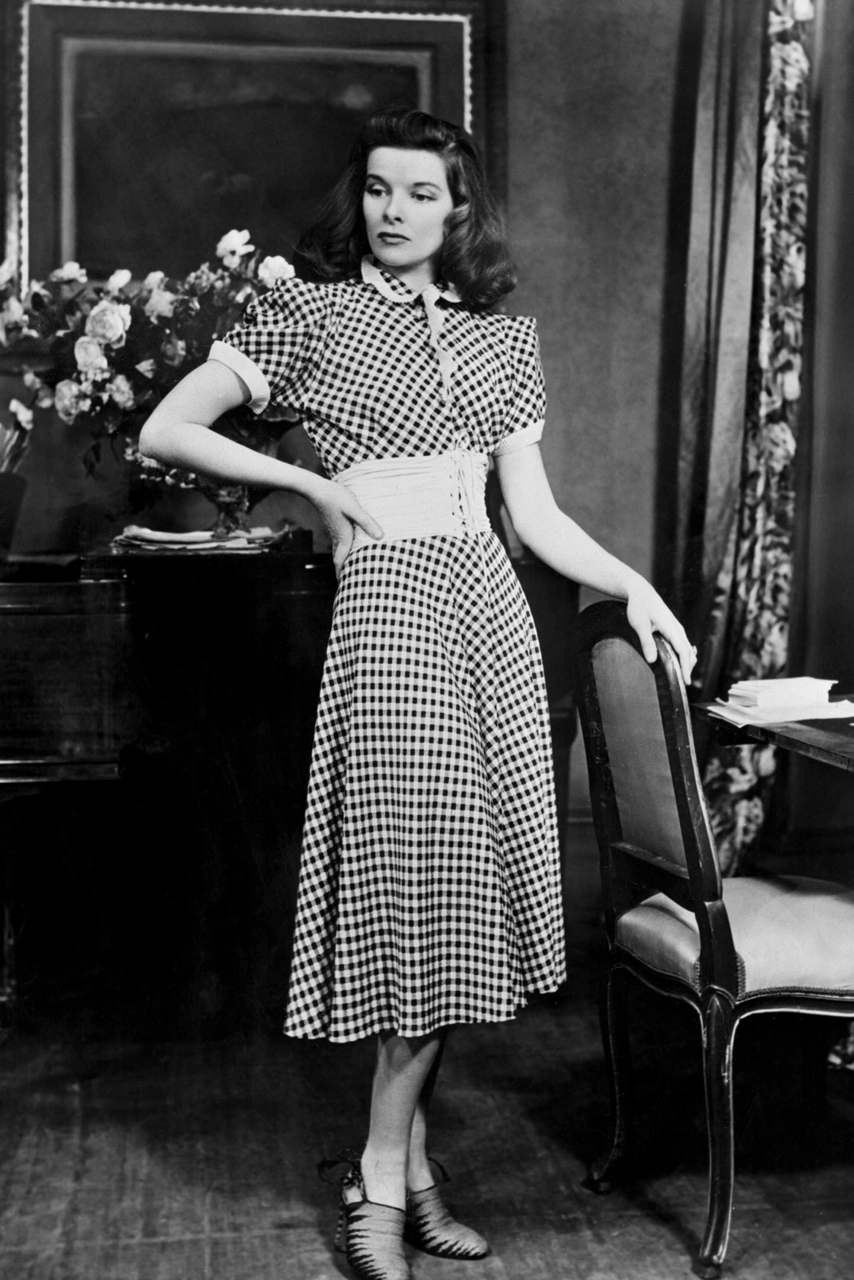
7. Katharine Hepburn, 1940
Katharine rocks a gingham dress and cinched-in waist on the set of The Philadelphia Story in 1940. Note the Peter Pan collar.
8. Joan Crawford, 1946
Joan does it again. Here she shows us how to work floral prints with some seriously statement jewels.

9. Grace Kelly, 1947
Princess Grace Of Monaco always looked flawlessly chic - even as a teen model in 1947.

A Brief History of 1940s Vintage Makeup –

As the 1930s came to a close, 1940’s women’s makeup was a huge industry, with brands such as Coty and Tangee notably becoming major rivals to cosmetic brand leaders like Max Factor, Helena Rubinstein, Maybelline, Elisabeth Arden and Dorothy Gray. Not even another world war was going to halt the advance of glamour.

The 1940s has a look all to its own. Confident up-do hairstyles, redder than red lipsticks and nails and prominent arched eyebrows. Lipsticks in the 1940s were red all the way and while there were now countless shades to choose from, the final objective of any young lady in the 1940s was prominent red lips. Replacing the thin understated lip contours of the 1930s was a deep luscious full mouth.

The glamorous era of the 1940s brought makeup to a new level of femininity. Despite war rationing, women round the developed world began applying makeup from their teen years. Only twenty years earlier this would have been unthinkable.

max-factor--pan-cake-makeup-1940s--rita-hayworth
1940s foundation
Foundations were a heavy affair, generally darker than the natural skin tone. Today, to achieve that 1940s look, just use your own foundation to get the base. Then apply loose powder in a thin arch from the top of your cheekbone up toward the temples. The idea is to get a true triangle effect!

Eye makeup looks of the 1940s was that of well shaped ( though less plucked than 1930s ) eyebrows. Make a clear defined arch on the edge of the brow with your pencil. Eye-shadow techniques for the early 1940s concentrated on the sockets and left the brows largely untouched. The 1940s film noir eye look heralded the winged look and cat eye-liner style.
Lashings of black mascara to finish off.

Lipstick colors include light reds, fuchsia, pink reds and orange reds ! Finally nail varnish to match your cloths. A popular varnish was a navy blue, but reds, greens etc all go nicely.
Leave the cuticle and the very tip of the nail.

1940s-christmas-beauty-advice
1940s Christmas Makeup advice in Wartime London.
http://glamourdaze.com/history-of-makeup/1940s
http://vintagemakeupguide.com/1940s-look/


1940's Hair styles...
http://bestpickr.com/1940s-hairstyles
Victory roll
Betty Grable was the most famous Hollywood icon of the forties and the number one pinup girl of WWII. She set trends like the victory rolls hairstyle which is still an amazing vintage style today.

https://s-media-cache-ak0.pinimg.com/originals/5b/8f/4a/5b8f4ac3769a243805d96c162a62b0aa.jpg
Grace Kelly, short neat wavy hair off the face.


http://bestpickr.com/1940s-hairstyles


Ava Gardner was a movie starlet in the 1940’s with a gorgeous softly curled bob. The soft face framing waves work best with medium length hair so that they stay bouncy and aren’t weighed down.

Bumper Bangs 40's Hairstyle ❥❥❥ http://bestpickr.com/1940s-hairstyles
http://bestpickr.com/1940s-hairstyles
Jennifer Jones was a young movie starlet of the 1940’s who set and followed many fashion trends of the time. This particular hairstyle is called bumper bangs. Comb your bangs forward and curl with an iron from the ends toward your forehead. Use a bobby pin to secure each side of the bangs to your temples.

MY FAMILY PHOTOS FROM THE 40s
My Great nana

My great Nana

My Great Nana and my nan

My Great nana and Great Grampy

Styling the 1940s lace wig and putting on partner

In our previous lesson when our Lecturer Helen was showing us how to apply a lace wig and then creating a Victory roll in the hair. In our following lesson we carried on with our lace wigs and then put them on our partner.

Styling the lace wig:
  1. In our previous lesson we took out the rollers fro the front and created the victory roll and we didn't get time to finish the rest. So next was working with the back section of the hair. The back of the head was curled with tongs and gripped up, I then took my time and took each grip of the hair letting all the curls loose demonstrated on the photo on the right.

  2. Next I took my hair brush and brushed through the hair, giving it direction and manipulating it with my fingers so the curls fall together. The front on hair was already done due to the previous lesson however I did un grip the rolls and re do them so they were neater and then hair sprayed them into place.
Equipment:

  • Hair brush
  • pin tail comb
  • hair spray
  • grips
  • lace wig blocked onto head

Final hairstyle on lace wig on head block


Putting the wig on:

  1. Me and my partner Hannah then had to work on each other and put the styled ace wig on each other. Firstly I brush through her hair and then created a center parting and grabbed a section at the front of the head and wrapped it round in my fingers and gripped it to the head. I did this all over my partner head so the hair was completely up and pin tailed.


  1. Once the hair was completely up I took a stocking cap and put it over the head and brought the ears out and used my pin tail comb to tuck in any hairs. I then adjusted it at the front and used grips to pin the cap to the hair to keep it in place.
  2. I then took the gloom and pins off the lace lining of the wig and then asked my partner to put her hands at the front of her head so she can hold onto the front while I pull the wig over the back.
  3. I then adjusted the ears to the wig to know its on straight. Next was gluing the lace part of the wig to the outline of the head with a matstick spirit gum, (which there is a matte version of too) I then dabbed the spirit gum on the face and slightly on the lace and waited for it too go tacky and then stuck it down using cotton wool in tights, again not being too rough on the lace.
  4. I then finally gripped the wig  down also to make sure its extra secure, gripping the sides, back and the top at all anchor points.

Equipment:
  • Hair brush
  • pin tail comb
  • grips
  • stocking cap
  • matstick spirit gum
  • cotton wool in tights
  • grips

Final look- 1940's Lace wig


My Partners wig on me

Hair Chart


Final Evaluation

I really enjoyed creating a 1940's style on the lace wig as stressful as it was. I think I found it difficult because of the length and weight of the hair which made it harder to style as it was so long and also keeping it tight and secure because of the weight of the hair as it would drop slightly if you didn't have it secure enough. I'm extremely happy with how the curls came out at the back when tonging it as I was worried the curls would drop out however they came out as beautiful ringlets with lots of volume which I was very pleased about. Definitely the hardest part was creating the victory rolls and I must admit I did have to redo them a few times to make sure they were secure and similar to each other however In the end I was very pleased with how they looked. The 1940's style would of been shorter so it would of been easier to create if the hair wasn't so long. My timing on styling was good as I styled it and pinned my partners hair in one lesson however putting the heated rollers in and curling did take a lot of time up so I think I could work on my timing skills and try and create the style quicker however still making sure it's perfect and correct. Also I love putting wigs on and love seeing the transformation so I really enjoyed putting one on my partner and also becoming a red head myself.


Tuesday, 17 November 2015

1940's- Demo of how to take rollers out and putting the lace wig on and creating a Victory Roll


Lace Wig and Victory Roll 


In our practical lesson with our lecturer Helen which follows on from our lecture with Lottie we were carrying on with our lace wigs and creating the victory roll and then putting our lace wig on our partner. Firstly Helen showed us how to take the rollers out and then create a victory roll on the top and grip it in place. Once the hairstyle was created she asked for a volunteer to put the wig on someone, Terri kindly volunteered and Helen took the wig of the head which is pinned down with a gloom. She again demonstrated how to put tail curl the whole head and put a stocking cap on and then tucked in any strands with a pin tail comb. She then placed the wig over Terri's head with her help and adjusted the ears. Next was gluing the lace part of the wig to the outline of the head with a matstick spirit gum, (which there is a matte version of too) Dab the spirit gum on the face and slightly on the lace and wait for it too go tacky and then stick it down using cotton wool in tights, again down be too rough on the lace. She then showed us how to grip the wig to the head, gripping the sides, back and the top to make sure the wig is extra secure.


Demonstration Photos


After a very in depth demonstration of how to create the hair style and also how to put the lace wig on nice and secure it was our turn to do the same. Unfortunately we didn't have enough time to complete the whole look so in this lesson so we created the victory roll and then will carry on taking out the rollers and putting it on our partners the next week.


How to create a Victory Roll


Equipment and Products:
  • Lace wig and head blocked (from previous week)
  • Hair brush
  • Pin tail comb
  • grips
  • Hair spray
  1. Firstly I started with taking just the rollers out from just the front section of head. Once the rollers were out they created a beautiful curl which I gently brushed giving it direction.
  2. I then brought the hair upwards and rolled half of the hair in my hand and then rolled the rest downwards to the root of the hair. 
  3. I then used grips to pin in down on the inside of the roll to hide the pins, and also pinned in places I wanted to secure and then hair sprayed it to keep in place.
Final look- Front Victory Roll


Rollering my lace wig

Demonstration photo


In our recent wig and postiche practical lesson with Lottie we were being shown how to roller the front of our lace wig with heated rollers and its direction and also using hot tongs at the back and directional setting. Direction is very important when using roller and the hair will eventually be styled into a 1940's victory roll hair style at the end. Firstly we were shown how to apply the heated rollers at the front and it direction and also how the back will be done with hot tongs and brick work will follow down the back. Lottie firstly showed this to us using a Kate head and then we got out of lace wigs that we were using from the following week which the lace is now pinned to the head with a gloom and small silver pins so its ready to work on.

Tools and Equipment:
  • Lace wig and head which should be blocked to it 
  • Hair brush 
  • Pin tail comb
  • clips 
  • Heated rollers and clips 
  • Curling tongs 
  • grips 
  1. Firstly I retrieved my head and wig from the cupboard and using a brush, brushed through the hair making sure its nice and smooth and tangle free. I then got my heated rollers and curlers out the cupboard and turned them on ready to heat up for use. 
  2. I then sectioned the wig down the middle to create a center parting. I then grabbed my first roller which is a white coloured one and put it on the left side of the parting following down sideways and then clipped it in place with the black clips. I then did one on the other side of the parting and then another next to it on each side. Demonstrated on the photo on the right.
  3. There now should be four rollers in the hair two each side of the parting. Next I put one below however rollering backwards instead of down the side. I then followed with another one beside it further back and then another two below also in the direction of rollering backwards. I then did the exact same thing on the other side. All together there should be 12 rollers in the hair, 4 at the top and 4 on one side and 4 on the other side. 
  4. Now the front section is completely rollered, the back section is to be done with curling tongs. My tongs were ready and hot and I started at the top of the head at the center and curled them up held it on for around 5-10 seconds and used my pin tail comb to loosen it to pull the tongs out and then used a grip to hold the curl in place. 
  5. I then worked my way down the whole back of the hair curling each section and gripping each curl in place until the whole back was completed. 


Final look- completely set


Evaluation 

I think using the rollers weren't too bad I had to re-do a few to try and make sure they were nice and tight at the root so it keeps a nice lift at the top ready for the victory roll. I can honestly say I did struggle with curling the back as the hair is super long and heavy so as soon as I curled it a few of them dropped because of the weight and length however I just gripped them nice and secure so they would stay int he same shape. I also got quite a thick wig so it had a lot of hair and I think the whole look took me just over two hours as the hair took quite a while to curl the whole back. Half way through I did feel like giving up as the hair was so long however Lottie gave me confidence that for a 1940's victory roll the hair wouldn't be this long as it would be around shoulder length so if I can manage this I can manage curling any other hair, which made me feel better knowing that it wasn't because I'm bad a curling just the hair is so long and thick. I think I could work on my timing and maybe tried to complete it in a smaller time frame as I did take quite a while to complete the whole head of rollers and curls. I think overall once I finished all the curls and had the rollers in it did look quite neat and the sections were nice and even and gripped securely while it cools and sets.


Health and Safety

  • Do not run in studio 
  • keep work station tidy and in order 
  • be careful of trailing cables 
  • be careful of hot equipment such as tongs and roller 
  • Turn off heated equipment once done 
  • Keep bags, coats and items neat and away from work area. 


Chosen Decade for Assessment 1960's


http://mylusciouslife.com/wp-content/uploads/galleries/post-
1136/thumbnails/Vintage%20Vogue%20May%201967%20-%20Candice%20Bergen.jpg
After weeks of learning different eras and there trade hair styles we have been notified that our final assessment will be based on a particular decade. The decade chosen is completely up too us and be can choose any from the past 100 years, from what we have chosen we have to create two designs on an acrylic wig that we have bought. The first design has to been a historical design and has to represent the era and would of been worn during the decade, the second hair assessment is a modern design and something that could be seen on a catwalk today, this modern look can be completely made up as long as it has elements of the era.
----------------------------

Here we go... I have decided to.. yes do the 1960's. When studying each decade and looking at different hairstyle from the years I want to do the 1960's for my assessment creating a historical design and modern. Before creating and design both hairstyles I've decided to do some research and really look into the era and looks at a wide range of hairstyles from the decade, what the fashion was like, icons of the decade and then also look into more modern versions of the sixties such as fashion catwalks now and recreating the 60's. I will be drawing designs for both modern and historical and choosing which one I want to create for my assessment. Below are a few photos from the 60s just to get an idea of the designs I might create.

http://www.vaboomer.com/shrimpton-hair-p.jpg

http://extracandles.com/wp-content/
uploads/2015/08/4-1960s-hairstyles.jpg


http://hair-and-makeup-artist.com/wordpress/
wp-content/uploads/2014/04/1960s-Hair-TN.jpg

http://s59.photobucket.com/user/mikisu
/media/yxe0r2hu724l7u4r.jpg.html
You can already tell the sort of hairstyles that were being worn in the 60's, the hair looks quite bouncy and has volume at the top. The hair is either in a up do with a fringe or a sweeping side fringe or the hair is down with a fringe and the ends are flicked up and again bouncy volume or the hair is partly up and part down with a similar shape. I'm already starting to get an idea of sort of thing I can create and what it should look like to represent the 1960's. 


Tuesday, 27 October 2015

How to block a lace wig

Equipment:

  • Lace wig
  • pins
  • head
  • Gloon 
  • Water spray
  • cotton wool and stocking for clean
  • alcohol cleaner
  • tissue


We were firstly shown a demonstration by Helen of how to Block a lace wig and the process, once it was shown we gathered all the equipment and had a try ourselves.


  1. Firstly we started with placing the lace wig on the head and placing tissue under the lace. We placed some cotton wool in a stocking and dipped it in the alcohol cleaner and cleaned the lace at the edge. This process is gentle and gets off any dirt or make-up. Rub it over the lace carefully until all make-up is off.
  2. Next take the tissue away and flatten the lace down, then we grabbed a piece of gloom which basically looks like a bit of ribbon and spray it over with water.
  3. Then flatten the lace at the front and place the gloom on top of the edge of the lace and start pinning it down. Instead of pinning one after the other its better to pin one up and one down in a zig zag pattern to make sure the gloom stays secure. 
  4. Start working your way all the way round the edge of the lace pinning it in a zig zag pattern, once you get to the ear section go round it and then pin it to the top of the ear and we finished there.
  5. Do this round both sides of the lace following the edge and then finally with the last piece of gloom pin it to the head out of the way


Final Look